UPDATE – Read Hacking a Fireplace – Revisited for an alternative approach to this hack.
I’ve been building my home automation system for years and have achieved extensive lighting, climate, entertainment, security and entry control. Never satisfied, I’m forever pondering potential refinements that would enhance the overall effectiveness and capability of my system. I recently concluded that one of those refinements would involve automating the control of the natural-gas fireplaces in my home.
Let me interject here that one should exercise EXTREME caution before deciding to implement any kind of automated home controls such as those I will outline below!
The key to gaining control of a fireplace is to have some kind of automated ignition system. In my case, I had Skytech remote control systems installed on each fireplace when I built our home. This system makes starting and terminating a fire as simple as pressing a button.
Why
As I’ve built my home automation system, I have focused on centralization and ease of control. Most of the house can be managed through a central console, but the interface is also accessible from a myriad of other devices throughout the house. My motivation was to get rid of the “ugly” Skytech remotes and incorporate control of the fireplaces into the central control system. This is not only more elegant than the current system, it, more importantly, allows me to incorporate the fireplaces into my HA scenes. Another reason for implementing automated control of the fireplaces is safety. Imagine, if you will, that one of my children are the last to leave the house for the day and forgets to turn off a fireplace. With centralized control, the HA system can now automatically turn off all fireplaces when it senses that the house is empty or when the security system is engaged. Another scenario would be to automatically shut-off the fireplaces if the HA system senses a structure fire or if high levels of carbon monoxide are detected.
The Plan
Since I’ll replace the every-day use of the fireplace remotes with my centralized control system, I thought the easiest way to accomplish my goal was to use an Arduino and a couple of reed relays to simulate button presses on the remote.

Since my goal is to automate control, I decided to use an Ethernet Shield so I could make a simple URL call to turn a fireplace on and another call to turn a fireplace off.
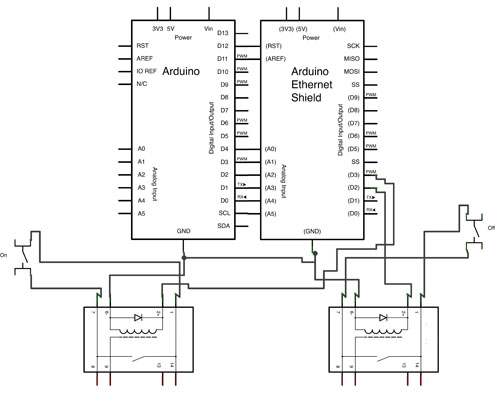
The schematic above shows what I actually implemented.
The parts
- Breadboard
- 1 x Arduino Uno
- 1 x Ethernet Shield
- 2 x Reed Relays
- Spool of solid 22 AWG wire
The relays I had on-hand were NTE Electronics SPST NO R56-1D.5-6D, although the on-board diode contained in this model is unnecessary, these would work just fine for this application.
The Implementation
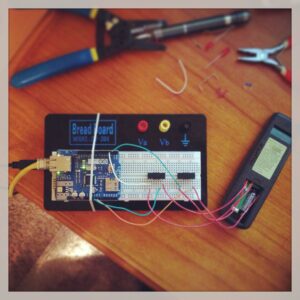
The key to accomplishing our goal is to open the remote and locate the buttons. In this case, the buttons are mini push button switches. I then turned the PCB over and located the pads for both the ON button and the OFF button. Once I knew where I needed to connect my relays, I then set up my soldering iron and proceeded to connect a six inch lead to two pads on each button and then put the remote unit back together.
Next I wired up my circuit:
ON Relay
- Arduino PIN2 to relay PIN2
- Arduino GRD to relay PIN6
- Relay PIN1 to remote ON lead
- Relay PIN7 to remote ON lead
OFF Relay
- Arduino PIN3 to relay PIN2
- Arduino GRD to relay PIN6
- Relay PIN1 to remote OFF lead
- Relay PIN7 to remote OFF lead
Now we need software to drive the circuit. The simple sketch below will tell the Arduino to engage our ON button relay, which should turn the fireplace on when 192.168.1.10/?RELAY=1 is called from an external application. Calling 192.168.1.10/?RELAY=2 will tell the Arduino to fire the off relay, which should turn the fireplace off.
#include <spi.h>
#include <ethernet.h></ethernet.h></spi.h>
// MAC address from Ethernet shield sticker under board
byte mac[] = { 0x00, 0x00, 0x00, 0x00, 0x00, 0x00 };
IPAddress ip(192, 168, 1, 10); // IP address, may need to change depending on network
EthernetServer server(80); // create a server at port 80
String HTTP_req; // stores the HTTP request
void setup()
{
Ethernet.begin(mac, ip); // initialize Ethernet device
server.begin(); // start to listen for clients
Serial.begin(9600); // for diagnostics
pinMode(2, OUTPUT); // relay on pin 2
pinMode(3, OUTPUT); // relay on pin 3
}
void loop()
{
EthernetClient client = server.available(); // try to get client
if (client) { // got client?
boolean currentLineIsBlank = true;
while (client.connected()) {
if (client.available()) { // client data available to read
char c = client.read(); // read 1 byte (character) from client
HTTP_req += c; // save the HTTP request 1 char at a time
// last line of client request is blank and ends with \n
// respond to client only after last line received
if (c == '\n' &amp;amp;&amp;amp; currentLineIsBlank) {
// send a standard http response header
client.println("HTTP/1.1 200 OK");
client.println("Content-Type: text/html");
client.println("Connection: close");
client.println();
// send web page
ProcessRequest(client);
Serial.print(HTTP_req);
HTTP_req = ""; // finished with request, empty string
break;
}
// every line of text received from the client ends with \r\n
if (c == '\n') {
// last character on line of received text
// starting new line with next character read
currentLineIsBlank = true;
}
else if (c != '\r') {
// a text character was received from client
currentLineIsBlank = false;
}
} // end if (client.available())
} // end while (client.connected())
delay(1); // give the web browser time to receive the data
client.stop(); // close the connection
} // end if (client)
}
// process request
void ProcessRequest(EthernetClient cl)
{
if (HTTP_req.indexOf("RELAY=1") &amp;gt; -1) { // see if request is for the ON relay
digitalWrite(2, HIGH);
delay(1500);
digitalWrite(2, LOW);
cl.println("1");
}
if (HTTP_req.indexOf("RELAY=2") &amp;gt; -1) { // see if request is for OFF relay
digitalWrite(3, HIGH);
delay(1500);
digitalWrite(3, LOW);
cl.println("2");
}
}
That’s it!
If you have more than one fireplace, just add additional relays and modify the sketch accordingly.
Conclusion
This method worked like a charm! I didn’t have to remove the fascia from the fireplaces themselves to access and modify the electronic valve control system. This method also leaves the remotes fully functional even though they have a tethered connection to the Arduino. This allows me to use the remote to start a fire even if there is a power failure in the house and the HA system is inaccessible.
Last but not least, another benefit of this implementation approach is the fact that there is no permanent damage. When I decide to sell my home, I’ll just snip the leads off of each remote and the new owners can use the remotes the “old fashioned” way!
Until next time – GEEK OUT!
~GT~


Pingback: Hacking a fireplace controller with Arduino | freetronicsblog
Pingback: Geek-Tips » The Fireplace Hack – Revisited