I have had an open item on my To-Do-List to set up a WebDAV Server for well over a year now. I needed a good distraction from my work activities for the weekend so I decided I would –finally- make this list item a reality.
For those that don’t know what WebDAV is, let me give you a quick overview. First off, WebDAV stands for Web-based Distributed Authoring and Versioning and is a set of extensions to HTTP that allows people to edit and manage files collaboratively on remote web servers. In short, it’s a web accessible folder; this is what Apple gives you with their iDisk service.
Since my current file server is a Mac Mini running Snow Leopard, I wanted to use that as my WebDAV platform. Apple’s OS/X has been WebDAV friendly for quite some time and Apple even makes setting up your own WebDAV server pretty easy. Keep in mind that the software that makes this possible isn’t Apple’s but is all open source. That said, Apple includes all of the necessary pieces with Snow Leopard, so its just a matter of configuring those pieces and then turning them on.
Step 1 – Enable Apache Web Server
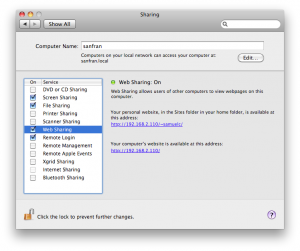
Since WebDAV is an extension of HTTP, we have to have an HTTP server if we want to accomplish our goal. Luckily Snow Leopard ships with the best web server available, Apache! Apple makes enabling an instance of Apache very simple, just go to System Preferences > Sharing and check the box labeled Web Sharing.

Once that’s complete, your web server is up and running. To validate this, click one of the two links shown in the configuration pane. If you don’t get a connection error then you’re in business.
Step 2 – Configure Apache Web Server
Now we need to edit our http configuration file. The file that we need to modify is http.conf which is located in /etc/apache2/. The best way to do this is to fire up a terminal window and use vi to make the change:
sudo vi /etc/apache2/http.conf
Look for the following lines and if commented (proceeded with a “#”) then remove the comment.
LoadModule dav_module libexec/apache2/mod_dav.so
LoadModule auth_digest_module libexec/apache2/mod_auth_digest.so
Now we need to tell Apache to load our WebDAV configuration file. To do this, locate the line below and remove the comment (towards the bottom of the file):
Include /private/etc/apache2/extra/httpd-dav.conf
Step 3 – Configure WebDAV
Now we need to edit our http-dav.conf file. The default configuration will work as long as the folders exist and the appropriate rights are set up. That said, the file locations didn’t meet my needs so I changed them along with a number of other settings. Following is what I ended up with:
DAVLockDB "/Library/WebServer/DavLock/DAVLockDB"
DAVMinTimeout 600

Alias /webdav "/Volumes/USB1/Shares"

<Directory "/Volumes/USB1/Shares">
    Dav On
    Order Allow,Deny
    Allow from all
    AuthType Digest
    AuthName WebDAV-Realm
    AuthUserFile "/usr/var/webdav.passwd"
    AuthDigestProvider file
    <LimitExcept GET HEAD OPTIONS>
        require user admin
    </LimitExcept>
</Directory>
A couple of items you might find helpful:
- The DAV ON directive MUST be within the Directory tags to work correctly
- Notice that I have DAVLockDB at the end of my path for the option with the same name … this shouldn’t be required, but I couldn’t get my instance to run without it
- My LimitExcept configuration REQUIRES that admin be authenticated
There is plenty of information available on configuring WebDAV for Apache … search Google for more options.
Step 4 – Bring It All Together
The first thing we need to do is create our folders.
sudo mkdir /Library/WebServer/DavLock
sudo mkdir /usr/var
Now let’s set the folder rights.
sudo chown www:www /Library/WebServer/DavLock
sudo chown www:www /usr/var
chmod 770 /Library/WebServer/DavLock
chmod 770 /usr/var
Now on to accounts and passwords. If you’ll notice in the http-dav.conf configuration above, we are using an authorization type of “digest”. One reason for going down this path is that many have reported problems using WebDAV with “basic” authentication with Windows 7. Making this work with Windows 7 was a requirement for me so I figured I would start with digest since it has been reported to work with Windows 7. The other reason for using digest is that it does not transmit credentials in clear-text which makes it a far safer option from a security perspective.
Now let’s create our user / password and assign our file to the appropriate group which we do as follows:
sudo htdigest -c /usr/var/webdav.passwd WebDAV-Realm admin
sudo chgrp www /usr/var/webdav.passwd
Step 5 – Test
Now we need to tell Apache to use our updated configuration and then validate that everything works as it should.
To accomplish this, let’s stop Apache, test our configuration and then start Apache back up.
sudo apachectl stop
sudo apachectl configtest
sudo apachectl start
That’s it!
Assuming you didn’t receive any errors when you ran the second command, you should be ready to go.
To test, Open Finder and then press Command-K and type localhost/webdav. You should be prompted for your credentials and then the folder should open just like any other. Be sure to test creating, changing, moving and deleting files.
Geek Out!
~GT~

I was confused what WebDAV means at first, but I now understand what it is through this post. =)